本文详细介绍如何利用 GitHub Packages 托管和发布私有 NPM 包的完整流程。从创建私有仓库、生成访问令牌,到初始化包配置、授权发布和使用包,每一步都有清晰的操作指南。文章还涵盖了不同的配置方式对比、包的可见性设置以及自动化发布的 GitHub Actions 工作流配置,为开发者提供了一份实用的私有 NPM 包管理方案。
之前提到过从 npmjs 官网下载的包长时间无人维护,存在 bug 无法使用,于是 fork 过来修改并在本地使用 npm link 的方式在本地项目中使用。
但是这种方式就只能在本地用了,如果项目要在远程部署,需要把自己的包托管在一个公开的地方,而 GitHub Packages 刚好是这样的地方。
下面就记录一下这个过程,虽然我的博客部署最终没有用到这种方案。
1. 准备一个私有仓库#
在 GitHub 上创建一个私有仓库,名称假设是 npm-repo,记住这个名字以及这个仓库的 URL 地址,后面会用到,然后什么都不要管。 然后 clone 到本地。因为我是先有本地仓库,这个时候将刚建的仓库添加为我本地的 remote 仓库就行。
这个仓库只是关联 npm 包的地方,不是存放制作的 npm 包的源码的地方 (虽然可以这么做),所以不需要 clone 到本地。
2. 准备一个 PAT#
即 Personal access tokens,在 GitHub 开发者设置里面。在给 token 授权时,加上 packages 相关的权限即可,生成后保存好这个 token,后面需要用到。
3. 在本地仓库中初始化 npm 包#
在本地仓库中执行 npm init --scope=<username> 这里的 username 即自己的 GitHub 用户名,如果有大写,需要小写。
然后会进入交互界面,需要填写 npm 包的一些信息,如:
首先是需要确认 package name,格式必须是 @GitHub 用户名/npm 包名
$ npm init --scope=cactusinhandThis utility will walk you through creating a package.json file.It only covers the most common items, and tries to guess sensible defaults.
See `npm help init` for definitive documentation on these fieldsand exactly what they do.
Use `npm install <pkg>` afterwards to install a package andsave it as a dependency in the package.json file.
Press ^C at any time to quit.package name: (@cactusinhand/npm-repo)
之后是将要发布的包的版本、包的作者、包的简单描述和许可证类型等等信息,不过目前这些都不重要。
这里重要的是 package name 要正确,然后就是在提示 git repository 时提供刚才创建的仓库的 URL,因为这个是最终要将发布的 npm 包进行关联的。这个仓库最好是私有的,然后里面关联各种 npm 包,它们可以是公开的,也可是私有的。
4. 告诉本地仓库服务 Registry 地址#
由于要将本地的包发布到 GitHub Packages 服务器上,于是需要确定远程服务的地址。
有两种方式:
- 方式一,创建
npmrc文件,并加入以下内容:
registry=https://npm.pkg.github.com/cactusinhand这里 registry 获得的链接其末尾也还是自己的 GitHub 用户名。
- 方式二,修改
package.json配置文件
在项目的配置文件 package.json 中插入以下内容:
"publishConfig": { "registry":"https://npm.pkg.github.com/"},推荐使用第一种方式(原因后面会提到)。
5. 发布包时如何授权#
根据前面的两种配置 registry 地址的方式,授权相应就也有两种方式。
- 方式一,还是
.npmrc文件。在这个文件里面添加以下内容:
//npm.pkg.github.com/:_authToken=0fc31c688a4a75f9509444b4648ac8e5fbeb20c4
- 这里最前面的
//不能少- 后面的 token 就是刚才创建的 PAT 码
于是现在的 .npmrc 文件是这样的:
registry=https://npm.pkg.github.com/cactusinhand//npm.pkg.github.com/:_authToken=0fc31c688a4a75f9509444b4648ac8e5fbeb20c4- 方式二,npm login 授权
在本地仓库执行 npm login --registry=https://npm.pkg.github.com, 然后进入交换界面,提示输入 Username,Password,
它们分别是自己的 GitHub 用户名和刚才生成的 PAT 码。
$ npm login --registry=https://npm.pkg.github.comnpm notice Log in on https://npm.pkg.github.com/Username: cactusinhandPassword:
Logged in on https://npm.pkg.github.com/.
最后出现 **Logged in on https://npm.pkg.github.com/.** 就是授权成功,登录到 GitHub 的 npm 服务上了。
6. 发布包#
包都准备好之后可以向 GitHub 发布你的包了。
执行 npm published:
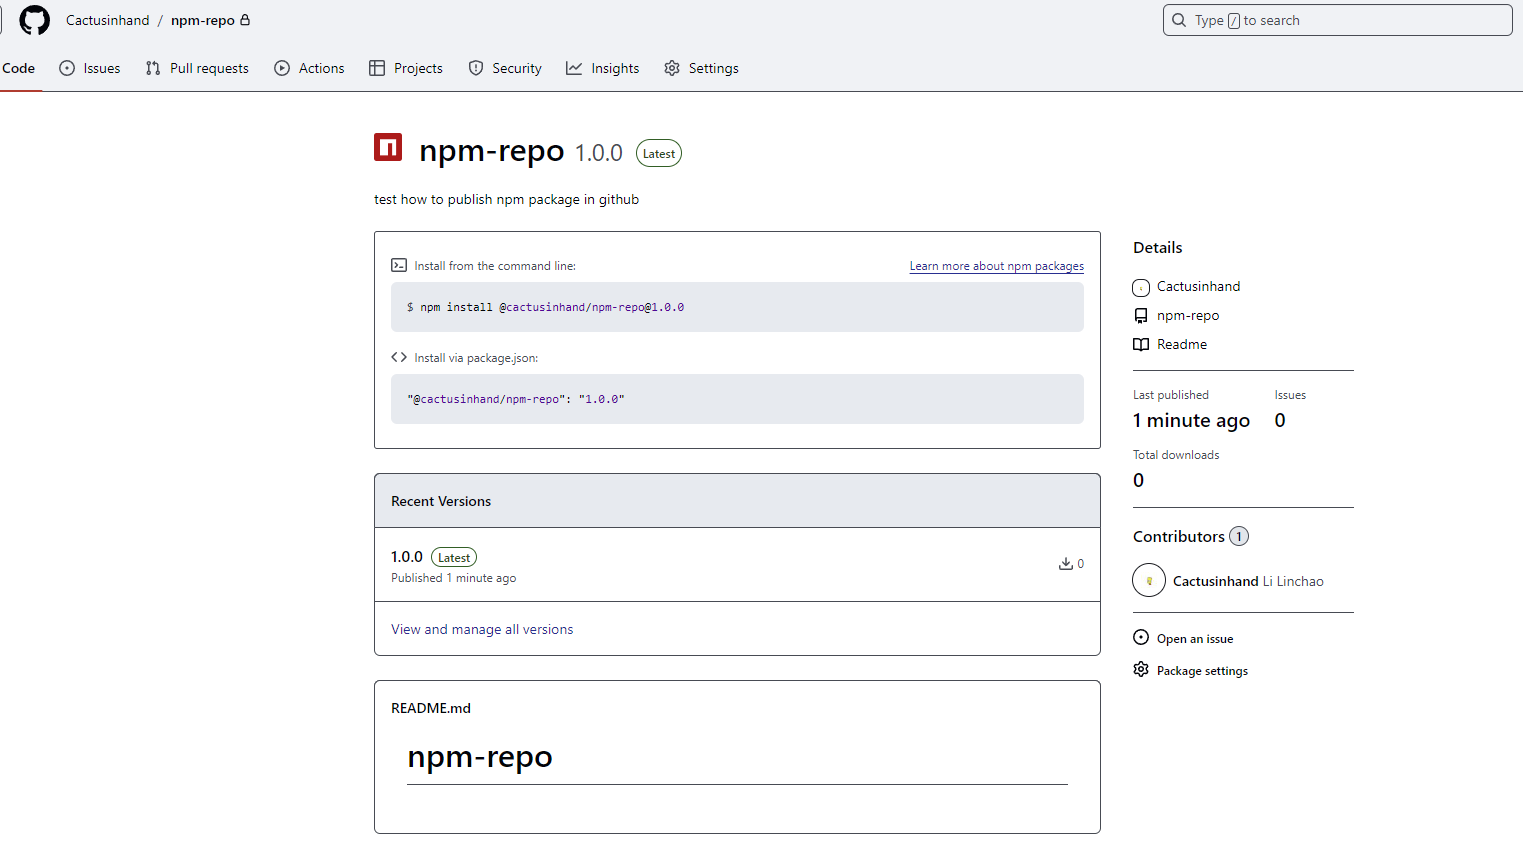
$ npm publishnpm noticenpm notice 📦 @cactusinhand/npm-repo@1.0.0npm notice Tarball Contentsnpm notice 11B README.mdnpm notice 57B index.jsnpm notice 635B package.jsonnpm notice 57B second-package/index.jsnpm notice 510B second-package/package.jsonnpm notice 0B second-package/READMEnpm notice Tarball Detailsnpm notice name: @cactusinhand/npm-reponpm notice version: 1.0.0npm notice filename: cactusinhand-npm-repo-1.0.0.tgznpm notice package size: 601 Bnpm notice unpacked size: 1.3 kBnpm notice shasum: 2ac09d846c3babc6553836f5744d6f1128831a50npm notice integrity: sha512-W1N/ud3KTMIXR[...]cRr7XvNB+rTAg==npm notice total files: 6npm noticenpm notice Publishing to https://npm.pkg.github.com/ with tag latest and default access+ @cactusinhand/npm-repo@1.0.0发布成功,包名就是:@cactusinhand/npm-repo@1.0.0
7. 使用包#
后面安装这个包的方式就是:
npm install @cactusinhand/npm-repo@1.0.0或者在 package.json 里面加上依赖:
@cactusinhand/npm-repo": "1.0.0"目前这包是私有的,要在其它项目里面使用这个包,也同样需要完成两件事,1) 告知发布 npm 包的 registry 地址,2) 授权。
对于 1) 如果不告诉项目要安装的包的 registry 地址,那么很显然,在 npm install 时,它默认去 https://registry.npmjs.org 这个地方找了。
而我们的包是在 https://npm.pkg.github.com/cactusinhand。所以这就是配置 registry 的意义。
配置方式同上面一样,要么创建 .npmrc 文件并在里面指定 GitHub 上的 registry 地址,要么就是在 package.json 文件里面指定这个地址。因为 package.json 是整个项目的依赖配置文件,所以最好不修改这个文件,这就是为什么推荐使用 .npmrc 文件的原因。
对于 2) 授权,其实到了这里可以授权,也可以不授权。原因很简单,私有包才需要授权,如果将刚才发布的包改为 public 就可以在使用时不必获取 token 进行授权。
找到刚才发布的 npm 包,进入 Package settings 页面,在 Danger Zone 更改包的可见性:
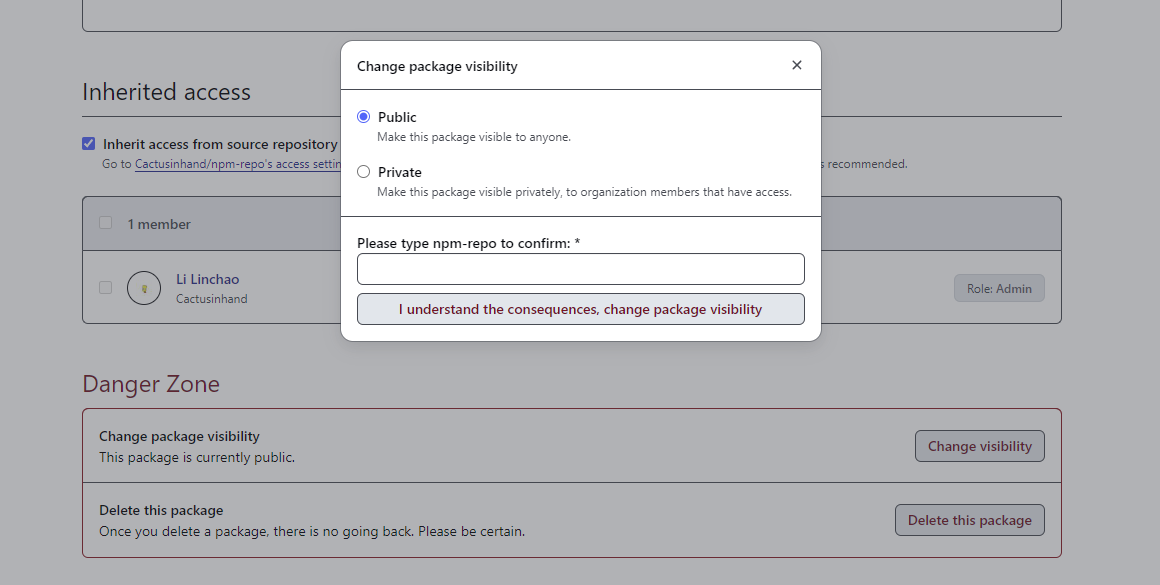
这样公开的包就可以无授权下载啦。
8. 使用 GitHub Actions 自动发布包#
在 npm 包的源码仓库中创建 .github/workflows 目录,并创建名为 release-package.yml 的文件,内容如下:
name: Node.js Package
on:  release:    types: [created]
jobs:  build:    runs-on: ubuntu-latest    steps:      - uses: actions/checkout@v4      - uses: actions/setup-node@v4        with:          node-version: 16      - run: npm ci      - run: npm test
  publish-gpr:    needs: build    runs-on: ubuntu-latest    permissions:      packages: write      contents: read    steps:      - uses: actions/checkout@v4      - uses: actions/setup-node@v4        with:          node-version: 16          registry-url: https://npm.pkg.github.com/      - run: npm ci      - run: npm publish        env:          NODE_AUTH_TOKEN: ${{secrets.GITHUB_TOKEN}}
创建 .npmrc 文件进行授权,其内容如下:
@GitHub 用户名:registry=https://npm.pkg.github.com可以看到现在这个 .npmrc 文件跟前面的稍微有点不一样。
同样或者也可以修改 package.json 文件:
"publishConfig": { "@GitHub 用户名:registry": "https://npm.pkg.github.com"}将上述修改提交、推送到 GitHub。
这个时候再创建一个新的 Release 就会触法 Actions 进行自动发布包的流程。
流程失败可能原因有:
- 没有将
package-lock.json文件加入到项目 - npm run test 失败,因为
package.json文件里是这样的:"test": "echo \"Error: no test specified\" && exit 0" - 已经存在相同版本号的包:
fail Cannot publish over existing version
修复方法就是别忘了把 package-lock.json 文件加入到项目,发布前更新 package.json 文件里的版本号,将 test 的返回值修改为 0,即"test": "echo \"Error: no test specified\" && exit 0"。
以上。